The Tea-Pet |
 |
In this exercise we explore various tools to create a teapot in Amapi with organic looks, using NURBS mode.
1. Startup in Nurbs Mode
2. The Base Circle
3. Extrude the Circle
4. Building the Spout - a Gordon Surface
5. Profile Curves for Gordon Surface
6. Show the Body again
7. Move the Spout into Position
8. Punch a Smile on that Teapot
9. Oh put a Lid on it!
10. Rotate the Lid
11. Put a Tail on da Donkey..err,.... a Handle on the Teapot.
12. Mold the Ends of the Handle
13. Meta-NURBS are no Laughing Matter
14. Final Steps - Light, Camera, Action!
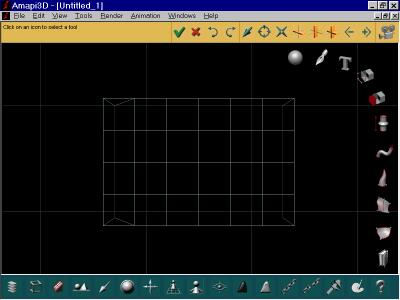
1. Startup in Nurbs Mode
Amapi 3D lets you work with NURBS as well as polygonal models at the same time. Some operations will create new Nurbs objects, such as surfaces from Nurbs curves, while other operations convert Nurbs to polygonal representations, either explicitly or in a conveniently automatic fashion.
By default, Amapi 3D operates in polygonal mode. In order to activate Nurbs mode, select the Nurbs Mode option from Tools menu, or hit CTRL+B once.

Click the '0' numeric key for zooming to the default (full extent of current scene, which should be empty and contain just a background floor grid and a work bench at this time).
Then select the front view (2) then the top view (5).
Click the Draw tool ![]() from the Construction toolkit.If you're not looking at the construction
toolkit yet, swipe the magic wand (cursor) to the right edge a few
times
until you see it.
from the Construction toolkit.If you're not looking at the construction
toolkit yet, swipe the magic wand (cursor) to the right edge a few
times
until you see it.

Note that because no object is in the scene yet, Amapi places the
coordinate
close to the center of the table automatically. If an object already
exists,
then you get to position the coordinate center by clicking a point from
the existing dataset.
2. The Base Circle
From the 2D drawing tools, ![]() select the left most, which is the Circle tool.
select the left most, which is the Circle tool.
Click close to the center of the workbench to position the center of the circle there.

Then move the cursor to see a circle change size with the cursor position and distance from the center. Click again to validate the indicated radius (shown in the lower-left corner). You can also enter the precise numeric value, simply by entering the TAB key, then the numeric value shown in the value box.
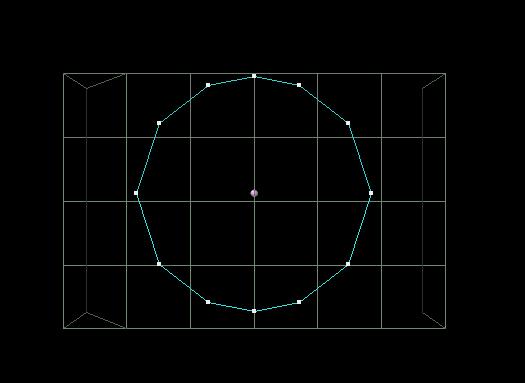
You have a chance to change the refinement (tesselation) of the circle with the +/- keys. Don't bother doing this at this time, as this is a Nurbs curve and we'll be able to smooth it or make it coarser later if necessary.
Swipe the tool away or hit ENTER or click the Ok check  in the Assistant palette at the top until you're out of the 2D drawing
palette and back in idle mode seeing the construction toolkit.
in the Assistant palette at the top until you're out of the 2D drawing
palette and back in idle mode seeing the construction toolkit.
3. Extrude the Circle
Select a view from the front (hit the '2' numeric key and/or use the
Up/Down arrow keys. Then click the Extrusion tool ![]() from the construction toolkit, and click the circle again to start
building
the extrusion. Move the cursor slightly.
from the construction toolkit, and click the circle again to start
building
the extrusion. Move the cursor slightly.

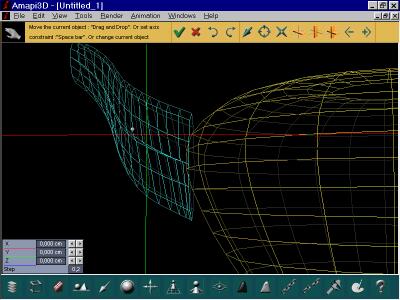
As you move the cursor, a rubberband bounding box is shown which contains the Nurbs cage.. Click again. A red mesh appears, which shows the Nurbs surface you are building as a result of this extrusion of the circle (which is a Nurbs curve).

Continue to move a few more positions and click as you wish to
create
the shape of a teapot container. Hit ENTER or click
to complete. A red outline appears at the top and bottom openings.

Click the bottom one, to indicate that you wish to close this
opening,
but don't click the top on. Swipe the tool away or click
to validate.
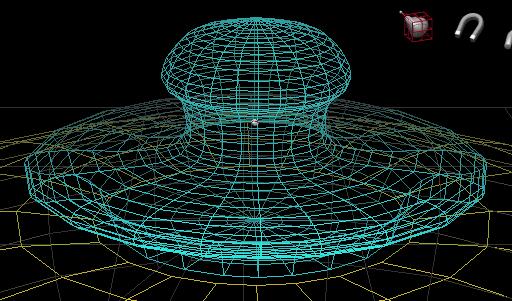
You should now have the basic shape for the teapot, with the top open.

This is now a Nurbs surface, as you can tell if you double-click the part in order to see its properties.
4. Building the Spout - a Gordon Surface
We will now build the spout of the teapot onto the left side. Start
by selecting a front view (2) and zoom to the entire extent (0), then
click
the DRAW tool ![]() from the construction toolkit and position the coordinate axes on the
left
side about where the spout will ultimately want to be attached.
from the construction toolkit and position the coordinate axes on the
left
side about where the spout will ultimately want to be attached.

Now switch to the left side view - hit the '4' numeric key. Click the circle from the 2D drawing palette and position its center at the center of the axes.

You are looking at the spout's bottom cross section head on. Click again when you have the desired radius for this circle.
Repeat the circle thing to create a second circle, smaller this
time,
placed high above the bottom one. This second circle will be the
opening
at the end of the spout.

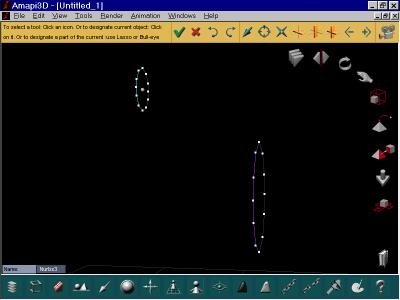
When the second circle is done, quit the 2D Drawing tool. Return to
the front view (2) and you will recognize that the two circles
are
in the same plane, the little circle on top of the bigger one.

You can move the smaller circle to the left in different ways. If
it's
the current object, select the MOVE tool ![]() (looks like a hand) from the assembly toolkit. Or, simply click, hold
and
drag the desired object and release it when it is in the desired
position.
The transition from current position while following your mouse
movements
is shown as a bounding box.
(looks like a hand) from the assembly toolkit. Or, simply click, hold
and
drag the desired object and release it when it is in the desired
position.
The transition from current position while following your mouse
movements
is shown as a bounding box.

You will notice that Amapi temporarily displays two axes, red and green in this case, along which you can move the object. If you wish to force and restrict the movement of displacement into one direction only, hit the SPACEBAR to toggle between the two axes or both.
If the granularity along the axes is too coarse, then you will see the bounding box of the moving object go in large increments, as if it was snapping to a grid. You can change the granularity of this with the +/- keys to make it coarser or smoother. You can also enter the exact amount of displacement if you so desired - simply hit the TAB key to go into numeric entry mode in the lower-left corner's data box.
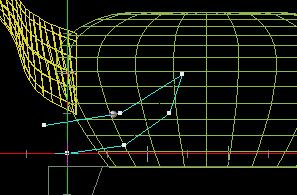
Eventually, you should have something that looks a bit like this:

5. Profile Curves for Gordon Surface
We will now create two profile curves, a bottom and a top curve, that connects between the two vertical circles. A Gordon surface can have multiple sections, in this case there will be just two circles. A Gordon surface can also have multiple profiles (or contours if you prefer to call them that), and again we'll have just two in this case.
Before starting to draw the curves, let's temporarily make the teapot's body invisible. This way we'll have a clearer picture of what we are dealing with.
If you have the control panel visible at the bottom, click the dark
ghost (HIDE) tool 
and then click on the desired object, i.e. the teapot's container
surface.
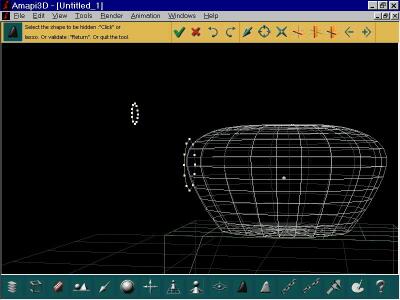 The surface
turns
white.
The surface
turns
white.
Swipe the tool away or click
or hit ENTER to validate, then hit zero (0) to zoom to the extent of
the
remaining curves.
Select the DRAW tool from the construction toolkit.

Since there's already an object in the scene, you'll need to click a point to position the coordinate axes. Click the top point of the bottom circle.

Now select the Curve tool from the 2D palette:
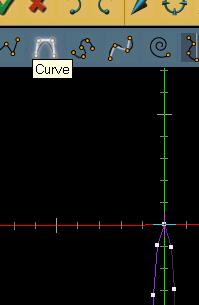
You will want to draw a curve which starts at a point which is shared with the bottom circle, such as the top point. To make sure that Amapi knows it needs to snap to that point which is nearest to your cursor, hold the SHIFT key down, move the cursor to the desired area, and click. If you missed, hit BACKSPACE to undo or ESC to escape and abort. You can also find other Undo options in Edit menu.

Click a few positions going between the top point of the large circle and the top point of the higher, smaller circle.
When you get close to the top point of the small circle and want to click that last shared point, hold the SHIFT key down again and let it snap to the desired point, then click.

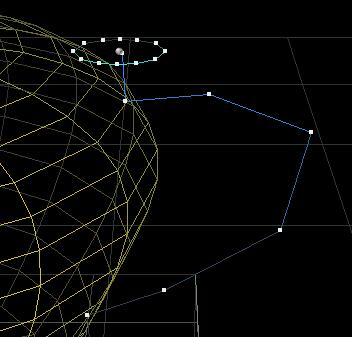
You can see here the white control cage of the Nurbs curve
(remember,
we're still in Nurbs mode) and the cyan colored curve that we generated
with it. Hit Enter or click
to validate
You will see a little 'X' mark at the end of the curve.
 This 'X'
indicates
that the curve is not completed yet, if we wanted we could continue
with
additional points, polyline segments, arcs, and more Nurbs segments.
However,
in this case we want a second independent curve, not a continuation of
the first one.
This 'X'
indicates
that the curve is not completed yet, if we wanted we could continue
with
additional points, polyline segments, arcs, and more Nurbs segments.
However,
in this case we want a second independent curve, not a continuation of
the first one.
Hit the SPACE BAR to toggle this 'X' mark off. 
Click the Curve tool again for the second (bottom) curve definition

and repeat the action again with the bottom point of the big circle as a starting point.


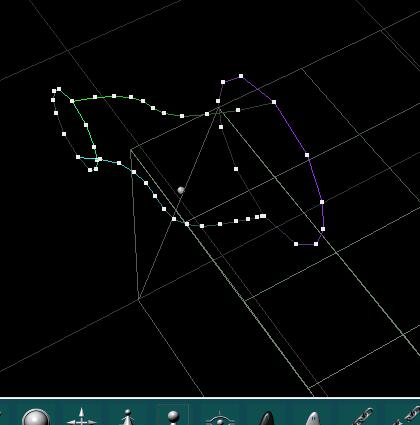
Take a slightly different look to inspect the sections and profiles.
Use for example the Arrow keys or the trackball from the view
controls
in the middle section of the control panel at the bottom of the screen:
 |
 |
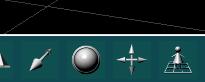
We are now ready to use the Gordon tool to create a Gordon surface from these two sections and profiles. Select the GORDON tool from the construction toolkit

The select (click) the first section (large circle, for example)

then the second section (small circle). They each turn white after being selected.

Hit RETURN, then click the two profiles. Hit RETURN again. The GORDON surface is calculated.

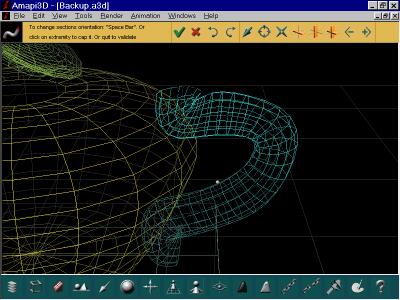
6. Show the Body again
You now have the spout and the teapot body, but the body is still invisible. Here's the front view, zoomed out.

Click on the white ghost (unhide, or 'SHOW') 
Then click the teapot body to make it visible again. Validate.


7. Move the Spout into Position
The spout may need a little repositioning. Select the spout as the current part. (click it). Then select the move tool from the Assembly toolkit.

You can once again lock the movement into one of the two axes, simply hit the SPACEBAR for this.


And if the motion is too coarse, keep in mind that you can use the +/- keys to change the granularity.
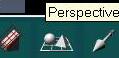
One thing that can also help is the Perspective toggle to Orthographic projection.

8. Punch a Smile on that Teapot
We will now use the PUNCH tool (Boolean) to cut out the profile of a smile. Select the teapot's body as the current part (click it).
Select the PUNCH tool from the bottom of the assembly
toolkit 
While still in orthographics projection mode, click the same teapot body again to indicate you want to draw the cut outline right on it.

(If you want you could have drawn the cutout shape first and selected it here. Instead, we'll draw it right now).
Click again to position the axes of the temporary coordinate center.

Click again, outside of the teapot, in the lower-left area, to start a polyline. Click a few points going into the teapot and up like a smile.

Make a turn and draw a few more points. The last point should be outside of the teapot again.
Hit ENTER or Validate with
This will start the calculation of the boolean operation. Amapi extends cutting blades through the polyline and cuts through the selected object. Use the +/- keys to highlight one or the other sub-part.

Leave the orthographics view mode - return to Perspective

Use the Hide tool to hide the inside of the mouth and open the smile. When done, hit RETURN to check the shaded rendering of what we currently have:

9. Oh put a Lid on it!
Select a top view. Zoom out if necessary.

We will want to draw a circle at the top opening. For this we select the 2D DRAW tool again from the construction palette.
Position the coordinate axes onto any point at the opening top. This will place the place through that point.

Zoom in a bit. (numeric '1' or '3' keys).

Now select the Circle from the 2D palette
Select the top view (numeric '5') or rotate to the top view with Arrow keys or Trackball in viewing controls. The goal is to look down to the opening of the teapot. The drawing plane remains at the same elevation as the selected point on the rim.

Draw a cicle, centered at the center axis of the teapot opening, and with a radius slightly smaller than the opening.
Rotate back to the side when done.

The circle is still a Nurbs curve.
Select the Extrusion tool again. Click the circle again to grab it upward.
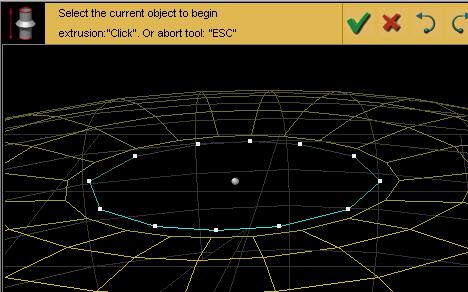


Hit ENTER tor Validate to finish. At the top of the lid, a small red circle may remain. Click it so as to close that opening. Don't bother with the opening at the bottom. Validate or swipe the tool away.
10. Rotate the Lid
Our teapot is going to be a happy camper, so it'll be dancing a jig and thus the lid will fly over his (her?) head.
Select the ROTATE tool from the assembly toolkit.

You'l notice that a Nurbs cage appears, because the surface is still a Nurbs surface.
Click the icon to indicate we want to specify a different rotation
center
- ![]()
(or if you don't have the assistant enabled, hit right mouse button on PC, Meta-click (or something like that) on Mac).
Click a point to select it as the pivot point for the rotation we're about to perform.


Select one of the tickmarks on the blue rotation scale. This sets the starting angle.
If necessary, use +/- keys to change the granularity.
Move (rotate) the cursor, then click again at a different angle to release and perform the rotation to that angle.

Swipe the tool away or Validate, and hit RETURN to do a quick rendering.

11. Put a Tail on da Donkey..err,.... a Handle on the Teapot.
Select the DRAW tool again. Place the axes at the right side (back of teapot). (I'm gonna have to start calling it tea-pet soon :-)

Select the Polyline tool (between the ARC and CURVE tools) and draw a rough shape, sort of like a question mark. Note that there is a bit of a stick at the top, like an antenna. I drew this polyline from top to bottom.

Next, Select the Circle tool. Hold the SHIFT key down to position the center at the first point at the top of the "antenna". DO NOT CLICK THE SECOND TIME YET, as we want to change view orientation before we fix the radius.

Change your view orientation (ARROW keys or TRACKBALL in control panel) to look down from the top, then finish the circle. The cicle is now parallel to the plane of the teapot's base at the bottom.
Change the view back down to side view:
Quit the DRAW tool. Select the SWEEP tool ![]() after making sure that your current object is the circle, not then
polyline.
We will want to sweep the circle along the line.
after making sure that your current object is the circle, not then
polyline.
We will want to sweep the circle along the line.

Click the polyline.
Note that you can select among various orientations of the circle, simply by hitting the SPACEBAR again and again.
You can also reduce or include the size of the section (cicle) at one end (at the end of the sweep) by using the +/- keys.

12. Mold the Ends of the Handle
Zoom into the bottom end of the handle. (Use the '1' numeric key and click once, zoom, and click again to set the zoom window size).

The handle will likely need to be repositioned and molded into a better shape to reach the teapot nicely.
Click the MOLD tool in the modeling toolkit.

You can tell that this is still a NURBS surface because you get a Nurbs cage to interact with.
Click the Circle/magnet icon ![]() in the upper-right corner or hit CONTROL-SPACEBAR to activate the
sphere
of influence. YOU MAY HAVE TO USE THE +/- KEYS TO REDUCE THE SIZE
OF
THE CIRCLE. IT MAY BE TOO BIG INITIALLY FOR YOU TO SEE IT IF YOU"RE
ZOOMED
IN TOO MUCH.
in the upper-right corner or hit CONTROL-SPACEBAR to activate the
sphere
of influence. YOU MAY HAVE TO USE THE +/- KEYS TO REDUCE THE SIZE
OF
THE CIRCLE. IT MAY BE TOO BIG INITIALLY FOR YOU TO SEE IT IF YOU"RE
ZOOMED
IN TOO MUCH.

Grab a set of control points on the Nurbs cage. Using an Orthogonal view will help here. You can then easily determine how far to adjust and tweak the shape.


Do essentially the same thing at the top

 Oh well, I
messed
this one up a little bit.
Oh well, I
messed
this one up a little bit.
Finally, weld all parts into a single entity. Use the WELD tool from the Assembly toolkit. Throw the lasso around the parts, and hit RETURN or validate.

Note that the lid and handle are still Nurbs entities up to this point. The Spout isn't because the GORDON surface we used there turns into a polygonal model. The smiling body of the teapot isn't Nurbs either, because the Boolean (PUNCH) tool turned it into a polygonal surface.
13. Meta-NURBS are no Laughing Matter
You can tell by the titles I'm chosing here that it's getting late. It's 2:48 am right now. (ok, that's not late, that's early).
Either way, we'll want our tea-pet to turn his smile into a laughter. We'll use the Meta-NURBS tool to "open wide", as the dentist would say.
Click the METANURBS tool at the top of the modeling toolkit - ![]()
A pseudo Nurbs cage appears (even though this is not a Nurbs object anymore!). Amapi calls it MetaNurbs.

In order to obtain more control points on the Nurbs cage, hit the + (plus) key a few times (2 times is enough here).
Click the Right mouse button or the LASSO tool in the assistant
palette
- ![]()
Throw the lasso about a few control points of the Nurbs cage, just about the upper-left quadrant, which control the snout and top of the mouth. We'll want to rotate these.

Click the Rotate tool inside the MetaNurbs palette - 
Rotate the selected control points (subset of the Nurbs cage) around a pivot point in the center of the teapot, behind the mouth's angle. Use the same steps as in rotating the lid (see above) to set the pivot point of rotation.

Swipe the tool away or validate. The teapot is now laughing!

Swipe the tool away again to remove the nurbs cage, and hit ENTER to
do a quick shaded rendering.
Et voila!

14. Final Steps - Light, Camera, Action!
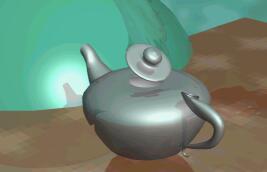
Finally, I applied a few light sources, placed a few more objects around the scene
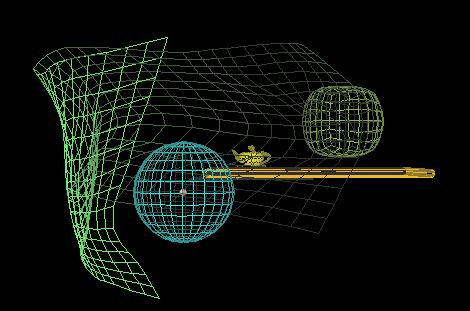
I also made the pieces reflective, applied bumpmaps, and a few other tricks, and here's a few renderings.
Modeled and Rendered in Amapi.Click the icons for larger images.