
 |
This little
Piggie went
to Market...
copyright (c) 2003 Philip Staiger |
 |
This mini-tutorial presents some idea for making clothes on a Poser character. It is based on ideas shown in a chapter written by Scoopey for Shamms Mortier's new book, the "Poser 5 Handbook" (Charles River Media Graphics Series).The piggie model used here came from Leonard Teo at planet3dart.com and is available as an Amapi model here.
 |
So, let's assume you have a model of a person, an animal,
humanoid
or other creature, and you want to provide it with some tight fitting
clothes.
All you've got to do is take away the unwanted parts such as toes, fingers, hand, head, neck etc... and you'll have the parts remaining which you can use to make clothes which fit almost perfectly simply by applying thickness. Here's a little piggie. It is in low polygon format, like you might encounter it in a game. If you have a model made of multiple parts (e.g. upper leg, lower leg, both left and right, plus hip area), then you may need to first weld the whole set (use the Weld tool). We're using Amapi 6.1 |
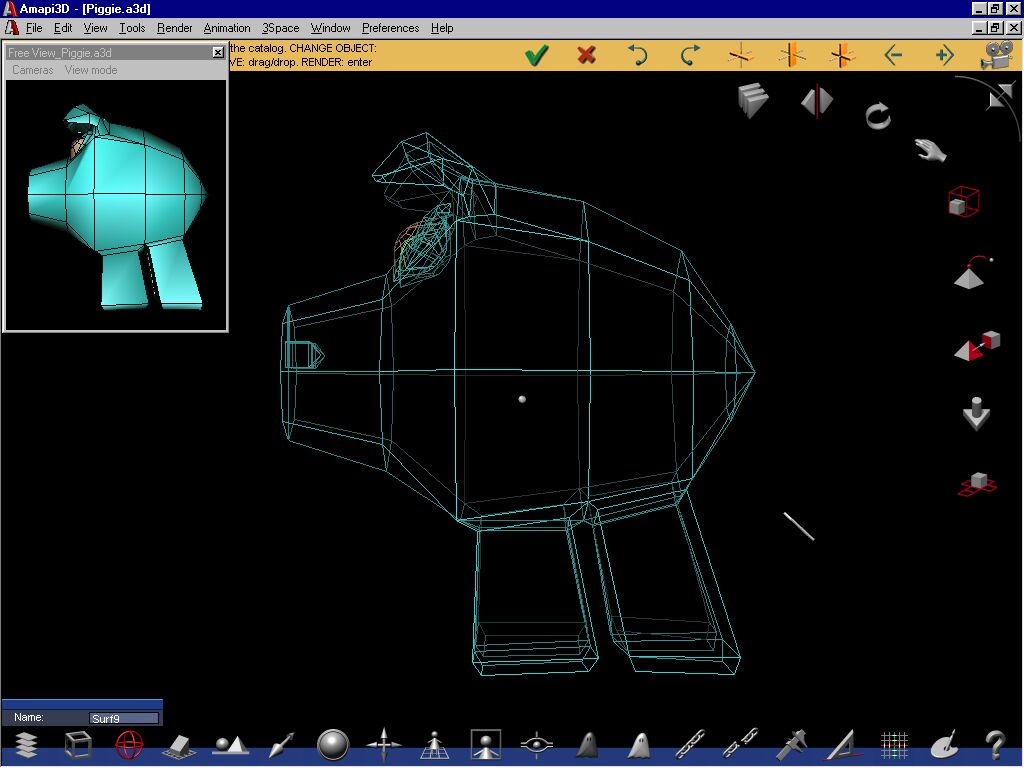 |
Here's a view showing is the piggie from the side.
We will simply be trimming away portions of this object by using the Cut tool (aka Boolean tool). We can simply draw profile curves used like a cookie cutter. Let's make sure we use Basic Wireframe mode. It's the default and can be reset in the Preferences menu, Interface submenu (or Workshop for version 5 and earlier). |
 |
In the lower-left area of the control panel at the bottom of
the screen
you'll find the tool to toggle between Perspective nd Orthographic
view.
Let's use this tool to switch to a non-perspective view. That will allow us to more precisely position the cutting profile curve as we draw it. If you find yourself often in the situation where you need to switch between ortho and perspective views, then use the Shortcuts editor (Edit... menu) to define a shortcut like "p" for perspective toggle. This will save you a lot of time. |
 |
In the Construction toolkit, select the Draw tool, and use
any of the
line drawing tools you might need to draw a cutting line. This
could
be as simple as a polyline, or an arc, or a Bezier or Interpolated
curve,
or even a compound curve made of multiple parts of these.
You could lso import a curve from a file such as Pict or Illustrator. Position, scale and tweak the curve as desired. |
 |
In this example we'll use the "Interpolated Curve", which is
essentially
like a Spline curve going through the points you click and smoothing in
between.
With just a vew clicks you can create very complex and smooth outlines and cutting profile curves. |
 |
For the first point, click somewhere outside of the object,
like above
the back of the piggie near the belt line.
Then click inside the belly area and work your way down with one or more clicks. |
 |
When you reach the front belly, click outside of the body so
the curve
extends outside of it again.
This completes the top of the separation line, essentially long the belt line. At this time we could use the curve with the Punch tool, but we're going to want other pieces separated too, such as by the openings for the feet. Let's thus continue the curve. We can do more than just a flat clean cut, how about a little hill-billie look? |
 |
Continue on to the back legs. Keep drawing the profile which
will be
used to cut away the unwanted parts from the pants.
You can draw outside of the back legs and re-enter if you wish. This may add some cool looking holes to the fabric. |
 |
Okey dokey, here we are, almost done. We've also left a small
opening
for the piggie's tail.
Hit Enter after clicking the last point outside of the piggie above it's lower back. Use the +/- keys if you want to change the smoothing range for more or fewer points. Then hit Enter again. |
 |
We're practiclly ready now to use the curve as a cutting
profile with
the Punch (Cut) tool. Just one more thing:
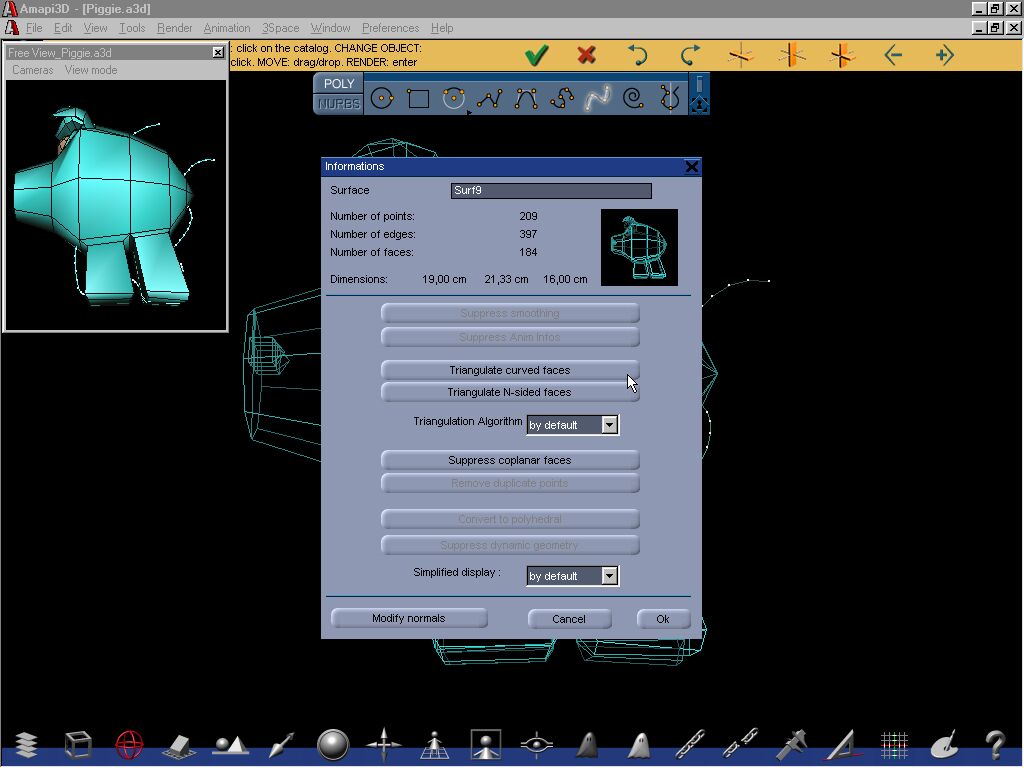
In some cases, you may get a warning when attempting to do such a punch operation, indicating a topology problem. This really depends on the model and indicates indeed that you may have something in the model that is not clearly defined for a Boolean operation to be performed. These can include curved polygons or other extreme anomalies. Double-click the piggie model and check the Information panel for details - can you suppress curved faces? It is not always necessary, but it may be the thing to try if you get an error or warning message. |
 |
Ok, let's do it.
First, click the piggie to make it the currently selected object. Then go to the Modeling toolkit and select the Cut tool (aka
Punch or
boolean tool).
|
 |
Then click the curve. This will use the curve as the cutting device, like a cookie cutter, along the main axis closest to the viewing direction. That's why it was recommended to switch to orthographic view because in Basic Wireframe mode it re-aligns itself to the main axes. |
 |
Shortly thereafter, the cut operation is completed and the
piggie separated
into two parts.
|
 |
Note that they may not immediately appear at different color. Use the +/- keys to cycle through the parts or arrow keys to refresh, or click one part (e.g. the nose) of the piggie and then the other (e.g. the belly). |
 |
This now shows the two separate parts.
Right no here, the pants are the currently selected object. Click the pig's face instead and delete it (hit the Delete or
Backspace
key).
|
 |
Here's a view of the remaining pants (we've also removed the
eyes).
Use the Thickness tool next. |
 |
Use the +/- keys to change the thickness.
Click the object to previe it with the thickness all over. Use +/- sopme more if needed. Hit Enter to finish and validate. |
 |
After the pants are completed you can re-import the original
piggie
into the same project. Use the File>Merge menu. Or, if the object
was in
Amapi format, drag it into the scene from the Catalog. This also merges
(adds) the model into the current project.
Here's a back-side view of our piggie. Both the piggie and the clothes still have the original low-polygon mesh. |
 |
If you apply some additional smoothing, such as the
subdivision smooth,
be prepared for some mild side-effects in some cases: If there is
only very little thickness to the pants, then it is possible in some
rare
cases for the smoothed polygons of the inside piggie to extent beyond
the
smoothed piggie of the rags he's wearing. In this example we see one
such
case on each leg and one around the center of the body. These can
easily
be fixed with the Stretch tool by extending the pant's surface a little
bit more outward.
The End  |