
| Amapi 3D & Poser - very Hip..... | 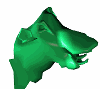 |
 |
|
hippo
model
from Amapi 3D v6 model gallery,
saved
as OBJ, shape changed with Amapi's Mold tool, saved again as a second
OBJ
file, used in Poser 3 as
morph
target to first shape. Rendered and morphed in Poser, saved as AVI
file,
imported and crop/resized/optimized to Animated GIF in Gamani
Gif Movie Gear.
|
||
Here's some general info that will help you when taking Poser models into Amapi for making a morph target:
Poser models are normalized to +/- 1.0 address space and thus details on these models appear very very small. In some cases so small that for Amapi they appear to be at the same location when two or three vertices are read in. Such vertices could then be droppped as illegal facets, resulting in holes in the imported model. Tough to make a morph target with that. Luckily, you can direct Amapi to import the model with a scale factor applied to it. The inverse of that scale factor will be applied when exporting.
Each import/export format in Amapi has its set of preferences. Look
in the Preferences menu for Import/Export. In Amapi 4 or 5 this was
called
IO (Input/Output) Settings.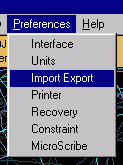 A dialog box window appears with various settings for each format.
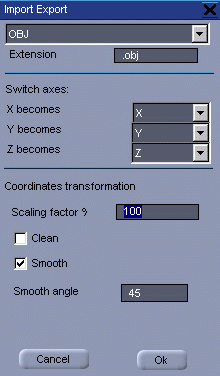 |
Each format can be selected at the top menu in that
dialog window. Select the OBJ (wavefront) format if that's how you export the model from Poser. You can also use 3DMF (if on Mac with Amapi). In this example the X,Y and Z axes are left unchanged. If you notice that your model gets flipped upside-down or rotated perhaps you need to try other combinations. Set the Scaling factor to 100 or so. This will bring
the imported
poser model to about normal size for Amapi's workbench. And you won't
have
those holes appearing from dropped polygons. The scale you enter is
used
for importing by Amapi. The inverse of that value (e.g. 1/100 or 0.01)
is used when re-exporting. This ensures that the data should still be
usable
where it came from, and typically that's what you want when making
Morph
targets. The I/O 'Clean' flag should not be used. If you use it there's a chance that Amapi will convert some facets to different format (such as a quadrilateral that appears curved to two triangles). This flag is used when you are working with bad geometric data in the first place, such as self-intersecting polygons. The I/O 'Smooth' flag is used for exporting with an
associated
crease angle in degrees (45 in this example). If you set it to zero the
model appears flat shaded after exporting. But I think it won't affect
the facet's topology as it shouldn't add or delete vertices. Only the
vertex
normals are affected (I think). The Smooth angle is thus a threshold
(crease)
angle. If facet normals of two neighboring facets have a different
direction
by an angle that's smaller than the indicated threshold limit,
then
the vertex normals are set accordingly with a direction that points
between
the two facet's normal's directions. This results in smooth shaded
appearance.
If the angle between the facet normals is larger than the indicated
angle,
this would indicate that we want to consider that to be a 'real' sharp
surface which will appear as flat shaded (creased). |
 |
This
little piggie
went to market... Making Clothes that fit tight to a model. |
Below are more resources on Morph targets for Amapi and Poser.
Creating
Morph Targets - a tutorial by Yoshihisa Inoi (English
/ Japanese)
Brycetech
- Awesome modeling
in
Amapi for Bryce & Poser!

be sure to follow the discussions and tutorials at the Amapi Forum in 3dcommune.com
Also: www.brycetech.com